A few years ago we were contemplating a period of austerity in our
lives. As the keeper of the household purse I spent some time
considering the amount we spent on food, and how it could be reduced.
My first thought, and one that I imagine occurs to many in this
situation, was to lower quality and put ethics to one side. To drop the
veg box, to buy non-organic milk, to get coffee which wasn't fair
trade. But this sat so ill with all that I believe about the food we
eat - that it should be fair, that it shouldn't damage the environment,
that it should be healthy - that I decided to think again. The
conclusion that I came to was that we had to make every (or almost
every) mouthful count.
This meant that foods which are basically
empty calories had very little place in our kitchen. White rice and
flour products, sugar, cake baking, all became real treats. I took the
same view with bread. When money is tight I need every bit of food
which goes onto my family's table to nourish them. White bread, even
delicious just-baked sourdough, has a high GI, reflecting the fact that
the body turns it easily into blood sugar. This leaves me hungry again
pretty soon. White bread is also without all those nutrients which
wholemeal bread can give to your body.
To get the best from those
nutrients your body needs some help. Grain and grass eating animals
have various strategies for dealing with the fact that grasses and their
seeds are not actually very digestible. Cows have multiple stomachs
and rabbits have a method which, to spare delicate constitutions, I
won't got into here. Suffice to say, the grass they eat gets digested
twice. Humans need the bread-making method to help them to digest and
assimilate the valuable nutrients, and that is where sourdough comes
in. The action of acid and the lacto-bacilli effectively performs a
partial digestion on the flour, meaning that our mammallian digestive
system can extract what we need it to from the bread. With yeasted
white bread the work of digesting the bread can actually mean an overall
loss of nutrition.
So although it might seem a little
counter-intuitive to say that high-quality, artisan bread is austerity
bread, I have found this to be the case. When every penny of the food
budget needs to be counted, every mouthful that money pays for must do
its work. And I have found is that this is a pretty good situation to
be in - naturally leavened bread tastes great, wholegrain breads have a
depth and range of flavour white breads find it hard to match, when you
learn how to cook good brown rice it tastes wonderful. There's still a place for cake in our lives, but now it's the treat it really ought to be.
Tuesday, 6 December 2011
The last post
From now on we will be blogging on our new site:
www.steamiebakehouse.com/blog
which you can subscribe to at:
www.steamiebakehouse.com/blog/feed
www.steamiebakehouse.com/blog
which you can subscribe to at:
www.steamiebakehouse.com/blog/feed
Thursday, 8 September 2011
Perks of the Job: No. 4
Along with all the gardening, going to the beach, getting rained on, and other summer activities which have been going on around here instead of blogging, we've been taking photos of our bread for our new website.
We've been taking 'whole loaf' and 'in use' pictures for the regular and the special loaves. 'In use' pictures required all kinds of props, including some smoked salmon, which goes so well with our Caraway Meteil.

And of course once you've taken the photo, you can't just let that smoked salmon go to waste now, can you?
You can see the new site here.
Tuesday, 28 June 2011
Tea Party
A few weeks ago we passed our final regulatory hurdle for the oven with the granting of our building warrant. With that out of the way we wanted to give a tea party to say thank you to our patient Bread Club customers who had hung on for us whilst we built the new oven. We also wanted to thank people who had been involved in the build, and to our neighbours.
So we gave the oven a special Saturday firing and made buns - chocolate and currant - and pizza. With onions, chard and courgettes from the Pillars of Hercules and cheese from the St Andrews Farmhouse Cheese company, we even managed local pizza toppings.

Pizza bases rising during the afternoon, overseen by Matthew as I bustled about with cups and saucers and tablecloths.

I was so busy pouring cups of tea, that I managed to not take a single picture during the party. The sign of a good afternoon, I think.
Sunday, 19 June 2011
Baguettes

In many ways, well-made baguettes are the epitome of white bread. The contrast of the crispy, crackly crust and the mellow, soft crumb, combined with a hint of chewiness and a gentle, mildly sweet and lingering flavour, the whole brought out with some cool unsalted butter, is, I think, one of the really great eating experiences.
Perfection comes at a price, though. Baguettes have perhaps the poorest keeping quality of any bread; after only a few short hours the crust is leathery, and the crumb stiff, and like all white breads, they have only modest nutritional benefits and all the undesirable health consequences that come with a high glycemic index. For these reasons, I generally eat them only as an occaisional treat. Since my baking ambition is to make great everyday breads I haven't been much fussed about making them either.
Some bakers, however, are very fussed about making them, and these include many for whom I have enormous respect, and to whom I have to acknowledge a debt of gratitude for knowledge shared. Jeffery Hamelman is perhaps foremost amongst these; in addition to his superlative book bread (covering everything from baguettes to Vollkorn Rye), he has a series of videos about baguette making viewable online and is a world champion baker. So although I don't have much interest in turning out 300 bags every week, it is difficult to avoid the conclusion that a decent baguette should be part of a serious baker's repertoire.
Every so often, then, I have a go at improving my baguettes. Below is my current recipe. It yeilds a crispy crust:

and a soft, open crumb:

and it makes me feel like a real baker. I'm so shallow!
Mini Baguettes:
(makes 8 200g baguettes)
Starter:
50g strong white flour
50g water
20g wholemeal rye chef
Ferment 4 hours at 28C.
Leaven
155g Strong white flour
85g Water
100g starter (from above)
Ferment 12 - 16 hours at 16C
Dough
850g Strong white
620g water
340g leaven (from above)
15g salt
25g olive oil
Mix flour and water, and leave to rest for 30 minutes. Add leaven, salt and oil and knead to a medium level of development. Ferment 4 hours at 24C, with folds at 50 and 100 minutes. Divide into 200g pieces, round and rest for 20 minutes. Shape, and prove for 2 hours. Bake 30 minutes at 240C with steam.
Notes:
Fermentation temperatures indicate the desired temperature of the dough, not the surrounding air. I have written about how to adjust the water temperature to achieve this here.
This is very much a bare-bones recipe because a lot of detail is not easily conveyed in writing. I strongly recommend watching Jeffery Hamelman's baguette videos, linked above.
Wednesday, 15 June 2011
Inspiration
Now that the oven is all finished we're busy developing new breads for the Bakery. Matthew is working on perfecting our wholemeal wheat loaf - while we were baking for ourselves in our kitchen during the oven build we tried different ways of doing the wholemeal. Some things were so successful that Matthew is trying to incorporate them into our regular loaf.
I'm working on developing new specials. The Sweet Lemony Fennelly was the first product of this process. The inspiration for the loaf was Laurel Robertson's Bread Book.

The two books which inspired our move to all sourdough, Andrew Whitley's Bread Matters and Dan Lepard's Handmade Loaf, concentrate mainly on white or mainly white breads. Whilst they are both inspiring books, we are so convinced of the taste and health benefits of wholemeal bread that we needed to look further afield for inspiration, and came to the American wholefoods guru Laurel Robertson.
Although Laurel Robertson's bread is not all sourdough, it is a fairly easy matter to convert the recipes to sourdough. This is how I began with the Sweet Lemony Fennelly. I love the combination of lemon and fennel, so I was delighted to come across the mix in one of Laurel's recipes. Hers is a savoury bread. My first step was to convert her recipe to sourdough. The bread came out really well, however, it needed some changes. We wanted another sweet bread for the bakery so we added light muscovado sugar. We also felt that the use of lemon zest would be too fiddly a process to replicate efficiently in the bakery, so we continued the sweet theme and brought in the lemon flavour with candied lemon. We ended up with a delicious loaf, excellent spread with butter the first few days, and toasted with almond butter for up to a week afterwards.

I wish I had a better picture, but I confess I was more interested in eating it than photographing!
Monday, 23 May 2011
New Shoes
A baker spends the vast majority of his working day on his feet, so comfortable footware is of prime importance. Matthew had been wearing his everyday shoes for baking, but they were getting pretty wrecked with flour and oil splatters, so whilst the bakery refit was going on we decided that when the time came it would be new bakery, new shoes.
For us, a sustainable bakery means, not simply organic flour or wood-fired, but trying to look with concern at all aspects of supply. We decided that for the bakery, as we do for ourselves, we should buy our shoes from Green Shoes in Devon. Their shoes are not cheap, but they are made in Britain with concern for the environmental impact of their raw materials. I have two pairs of their shoes - one for winter, one for summer - which I wear almost every day (sadly in Fife the winter ones get considerably more wear than the summer ones!). They are extremely comfortable and I think they look great. The other wonderful thing about Green Shoes shoes is that when they get a bit worn, you send them back down to Devon - they get a full service and come back looking and feeling like new.
Here are the new bakery shoes in all their glory when they arrived a few weeks ago -

They are considerably more floury now than in this picture, but with a little care and attention should last for years.
Saturday, 14 May 2011
Human Planners
When we started out, we were baking in our own kitchen. One of the more straightforward regulatory hoops we jumped through was to check whether there were any planning issues we needed to worry about. It turned out there weren't, so long as we didn't take on employees or do retail from the house.
Later, when we started thinking about the wood-fired oven, I asked a Development Services officer whether planning permission was required for such a structure. "Not a planning matter", I was told.
So the letter we got shortly after the oven chimney went up was a pretty nasty shock. We had carried out unauthorized development, it said. We had 28 days to apply for retrospective permission, or remove the offending chimney. Also, we would need to seek permission if we wished to bake bread for sale. The following weeks were stressful. In rare moments of optimism, I thought that we might manage to find alternative premises during lengthy rounds of applications and appeals.
The first thing I did, though, was to write back and ask for clarification. I explained that I had checked whether we needed permission. I used a lot of phrases like "sustainable development". And a few weeks later, I got a reply. No permission was required. The case was now closed. They wished us success with our business.
There are many stories about the kafka-esque beaurocracy of planning authorities, and there do not seem to be very many people reporting happy experiences, particularly amongst people wanting to do anything unusual. Sometimes aquiring such a story feels like earning one's spurs but I think I'm much happier reporting that the planners I dealt with were as straightforward and thoughtful as one might hope for.
Thursday, 21 April 2011
Towards a local loaf?
Over the pond in Amherst, Massachusetts the lovely people at the Wheatberry Bakery and Cafe are able to bake a local loaf using flour from traditional flour varieties grown in the valley around their bakery. They have also set up a CSA for grain and beans, allowing people to get their staples from the local area. Helped by their dedication to bring grain growing back to an area now considered inappropriate for wheat growing, local farms (including their own) are trialling and growing traditional wheat varieties. A couple of years ago they were able to make a true local loaf.
Aren't they beautiful?
You can read Ben's account of their creation here.
We're lucky to get our wheat from Northumberland, pretty local compared to the distances traveled by the majority of bread flour. But it's one of the great ironies of the modern food system that I can see wheat being grown from our flat, but it is almost impossible to buy wheat from Fife.
We've decided to attempt to grow our own loaf in a very local way - from our back garden! The Real Bread Campaign is having a Bake Your Lawn initiative, and we've dedicated a tiny patch of our pocket-handkerchief garden to growing a handful of seeds kindly given to the girls by Gilchesters Organic. We've put them in. Only one question remains - will they sprout before the pigeons find them?
 | ||
| Wheatberry Cafe Local Bread. Thanks to Adrie and Ben for permission to use this photo. |
You can read Ben's account of their creation here.
We're lucky to get our wheat from Northumberland, pretty local compared to the distances traveled by the majority of bread flour. But it's one of the great ironies of the modern food system that I can see wheat being grown from our flat, but it is almost impossible to buy wheat from Fife.
We've decided to attempt to grow our own loaf in a very local way - from our back garden! The Real Bread Campaign is having a Bake Your Lawn initiative, and we've dedicated a tiny patch of our pocket-handkerchief garden to growing a handful of seeds kindly given to the girls by Gilchesters Organic. We've put them in. Only one question remains - will they sprout before the pigeons find them?
Wednesday, 13 April 2011
Fife Spring Pie
 We had three amazing bags of green in our veg box from the Pillars of Hercules last week - spinach, ruby chard and salad. My thoughts immediately turned to Sarah Raven's version of Spanakopita, Ithaca Pie, from her Garden Cookbook.
Sarah's version was my basis, but I didn't have some of the greens she mentioned (no spring onions here yet), so I decided to go Greek and get foraging in our garden for the wild greens and herbs which make this pie zing. I used to live in Greece as a small girl and well remember the 'horta' gatherers - usually old yayas (grandmothers) dressed in black - gathering greens from the verges. Fortunately I'm pretty slack about dealing with dandelions and nettles, so there was plenty of horta to be gathered even in our tiny garden.

I also used my own on-going experimental wholemeal pastry recipe. We try to avoid using refined flour in our cooking, and having discovered the technique of soaking wholemeal pasty flour in yoghurt, I have to say, it's no hardship. In the past I have found wholemeal pastry to be a little claggy in the mouth, but soaking seams to deal with this issue. I'll give you my pastry recipe below, but it is a work in progress and I'd welcome any comments.
I wanted to have a Fife Pie, so I made some substitutions from Sarah Raven's version of the Greek. I used Anster instead of feta, which proved to be a delicious substitution, and pinhead oatmeal instead of rice.
Fife Spring Pie.
750-1000g mix of spinach, chard or other spring green leaves - I also used nettles and dandelion leaves, and a mixed salad bag.
Large bunch fennel (our fennel is just shooting up at the moment, you could also use dill)
Large bunch flat leave parsley
Large bunch mint
1 onion, finely chopped
2 garlic cloves, finely chopped
300ml olive oil
A handful of Welsh onion shoots - or you could use a lot of chives, or some spring onions
2 leeks, finely chopped
100-150g of pinhead oatmeal (the higher amount if your greens are very wet)
200g Anster cheese (or your local cheese of choice), chopped small (0.5cm dice)
Salt and black pepper
Wholemeal rough-flaky pastry (see below for recipe) - you need to make this the day before.
First, saute the onion and garlic in a couple of tablespoons of the olive oil in a large saucepan, until golden.
Using rubber gloves, wash the nettles and remove from the water to drain, if using.
Then wash and remove any tough stalks from spinach and chard. Wash the other greens.
Chop the greens and finely chop the herbs.
Add to the onions all the greens, herbs and Welsh onions, spring onions, leeks, as you are using them. Jam on the lid and allow to steam for about five minutes, until the greens have collapsed.
Add the olive oil, oatmeal and salt and pepper. Mix well. Remove from the heat.
Pre-heat the oven to 160C.
Butter a small roasting tin you estimate will take your greens (about 40x40x4cm).
Using half your pastry, roll it out as thin as you can (couple of mm.), and line the buttered tin with it, there should be plenty hanging over the edge.
Roll out the other half thinly also.
Put the filling into the pastry case and sprinkle over the cheese.
Brush the pastry edge with water and manoeuvre the other bit of pastry over the top to form a lid.

Pinch the two layers of pastry together all around the edge, trim the pastry, leaving a generous couple of cm of crimped together pastry, and brush a little olive oil over the top.

Bake for around an hour.
Allow to cool a little before eating. We also had a great picnic with the leftovers the next day.

Wholemeal rough-flaky pastry
This recipe is an combination of the yoghurt pastry from Nourishing Traditions and Hugh Fearnly-Whittingstall's rough puff pastry from Everyday
525g wholemeal pastry flour (I like Doves Farm)
1 tsp salt
About 350g live, full-fat yoghurt
250g cold butter
Mix the salt into the flour
Cut the butter into small dice and mix into the flour until the butter bits are well coated with flour and well distributed. Add the yoghurt, beginning with 250g. At this point you really need to get your hands involved - mix until all the yoghurt has been taken up into the flour. You want to use as little yoghurt as possible, but you do need all the flour to be incorporated. Add the remaining yoghurt as necessary, little by little, until the flour and butter mix holds together.
Now leave a room temperature for 12 to 24 hours.
When you want to use the pastry, squash it into a roughly rectangular block on a well floured surface. With a rolling pin squish and roll it into a flatish rectangle (it will be very crumbly and hard to work at this point) which should be in portrait view on your work surface. Fold into three, top down then bottom up. Turn and repeat. Repeat another four times, but which time the pastry should be soft and easy to work.
Wednesday, 6 April 2011
Avocado Sweet
Last week we were visited by Jane and Michelle from Scottish style blog, Avocado Sweet.
You can read their piece on the bakery here
It makes me feel terribly modern, being interviewed for a blog!
You can read their piece on the bakery here
It makes me feel terribly modern, being interviewed for a blog!
Friday, 1 April 2011
The First Proper Bake
The oven got its second try out today, as Matthew baked a 'lucky dip' for the Bread Clubs. We didn't take any orders - he just baked a selection and took them round to the hub households. I'm sure he'll give you an update soon on how the oven is working, but I thought I'd share a couple of pictures from the bake today.

Here's Matthew wielding his new peel to free a couple of little hearth loaves which had got stuck behind a massive tray of oat loaves. They were successfully liberated, and eaten by the girls - sliced while still warm and spread with butter - in pretty short order.

And Bloomers on a rack cooling before going of to the Bread Clubs.
We're looking forward to getting back to normal baking and expanding the Bread Clubs now the oven is basically done. There are a couple of tweaks necessary, but it feels like we can look beyond to roller-coaster ride of oven building to steady baking.
Wednesday, 30 March 2011


Wednesday, 16 March 2011
Assembly
On Monday I posted on Facebook in a state of high excitement, due to the imminent arrival of the finished steelwork. Well, it arrived and we lugged it inside. Yesterday and today, Guy, Dave, and Dave's mate Garry have been putting it all together and mortaring in the bricks. Here's the lowest deck in position with the bricks finished:

You can also see the top of the super dooper fire door. Here is the view through the oven door with the lid on - the view I'll have during baking:

And here are all three decks in position:

The top deck is around eye-level. Attentive readers will remember that a few weeks ago I said I'd like to see Dave laying bricks whilst standing on his head, and I can tell you that he pretty much did that to get them in there. I'm pretty cross with myself for not getting a photo.
I'm also pretty cross with myself because the top one would have it's lid on... but I was too mean in my estimate of how many bricks we'd need, and I'll have to go and get some more tomorrow. If Christie's have the right size in stock it should all be done by lunchtime, when the chimney is due to arrive. If I have to order them it will take a bit longer, which is a frustrating prospect.
Our completion deadline of March 21st (ahem, revised deadline), seems awfully soon.
Wednesday, 9 March 2011
Lovely bit of beech
I finished sanding the surface of my workbench today, and I am pretty stiff in the forearms. It has taken a while, but I think it was worth it; I have more physical day to day contact with the bench than any other tool in the bakery.
The intimate contact of such lengthy sanding contains many opportunities for interpreting the patterns in the grain - a reward for virtue, as it were. Here are some of my favourites.
These two are pure Hebridean sky-island-seascapes:


And this streak of silver could be the side of a salmon:

Enjoy your day!
Tuesday, 8 March 2011
Steel!
David Henderson, the blacksmith who is fabricating the steel parts of the oven, has been brilliant. It has taken a bit longer than either of us expected, but he has more than earned his money on this project. I went up to inspect the progress yesterday, and it is looking great. Even better he promises delivery by the end of the week. Here are some pictures.
The three decks stacked up:

Looking in through the open door. That mesh will need to be lined with screed and firebrick:

Lovely. It'll be a bit of a scramble, but I think we're still on course to meet our revised reopening date of the 21st.
The three decks stacked up:

Looking in through the open door. That mesh will need to be lined with screed and firebrick:

Lovely. It'll be a bit of a scramble, but I think we're still on course to meet our revised reopening date of the 21st.
Wednesday, 2 March 2011
Insulation, and hot faces
With the blockwork done, we were almost finished with the firey end of things. When the mortar was dry we first tipped several hundred litres of loose fill vermiculite into the void:

Then we screeded the hot faces of the fireplace, the combustion chamber and riser sleeve:

And lastly we topped up the insulation, and screeded the whole top:
 With all that done we are waiting for delivery of the steelwork. In the meantime, I'm making a workbench. So far I've spent 2 days on my knees with a plane and a sander, smoothing the work surface. That makes it sound like a chore and several people have told me to use a floor sander. But actually it's very satisfying, just the right combination of physical work and constant judgement. Also, every hour that I spend doing it will make my baking life more enjoyable; at this point I am really looking forward to baking again.

Then we screeded the hot faces of the fireplace, the combustion chamber and riser sleeve:

And lastly we topped up the insulation, and screeded the whole top:

Tuesday, 15 February 2011
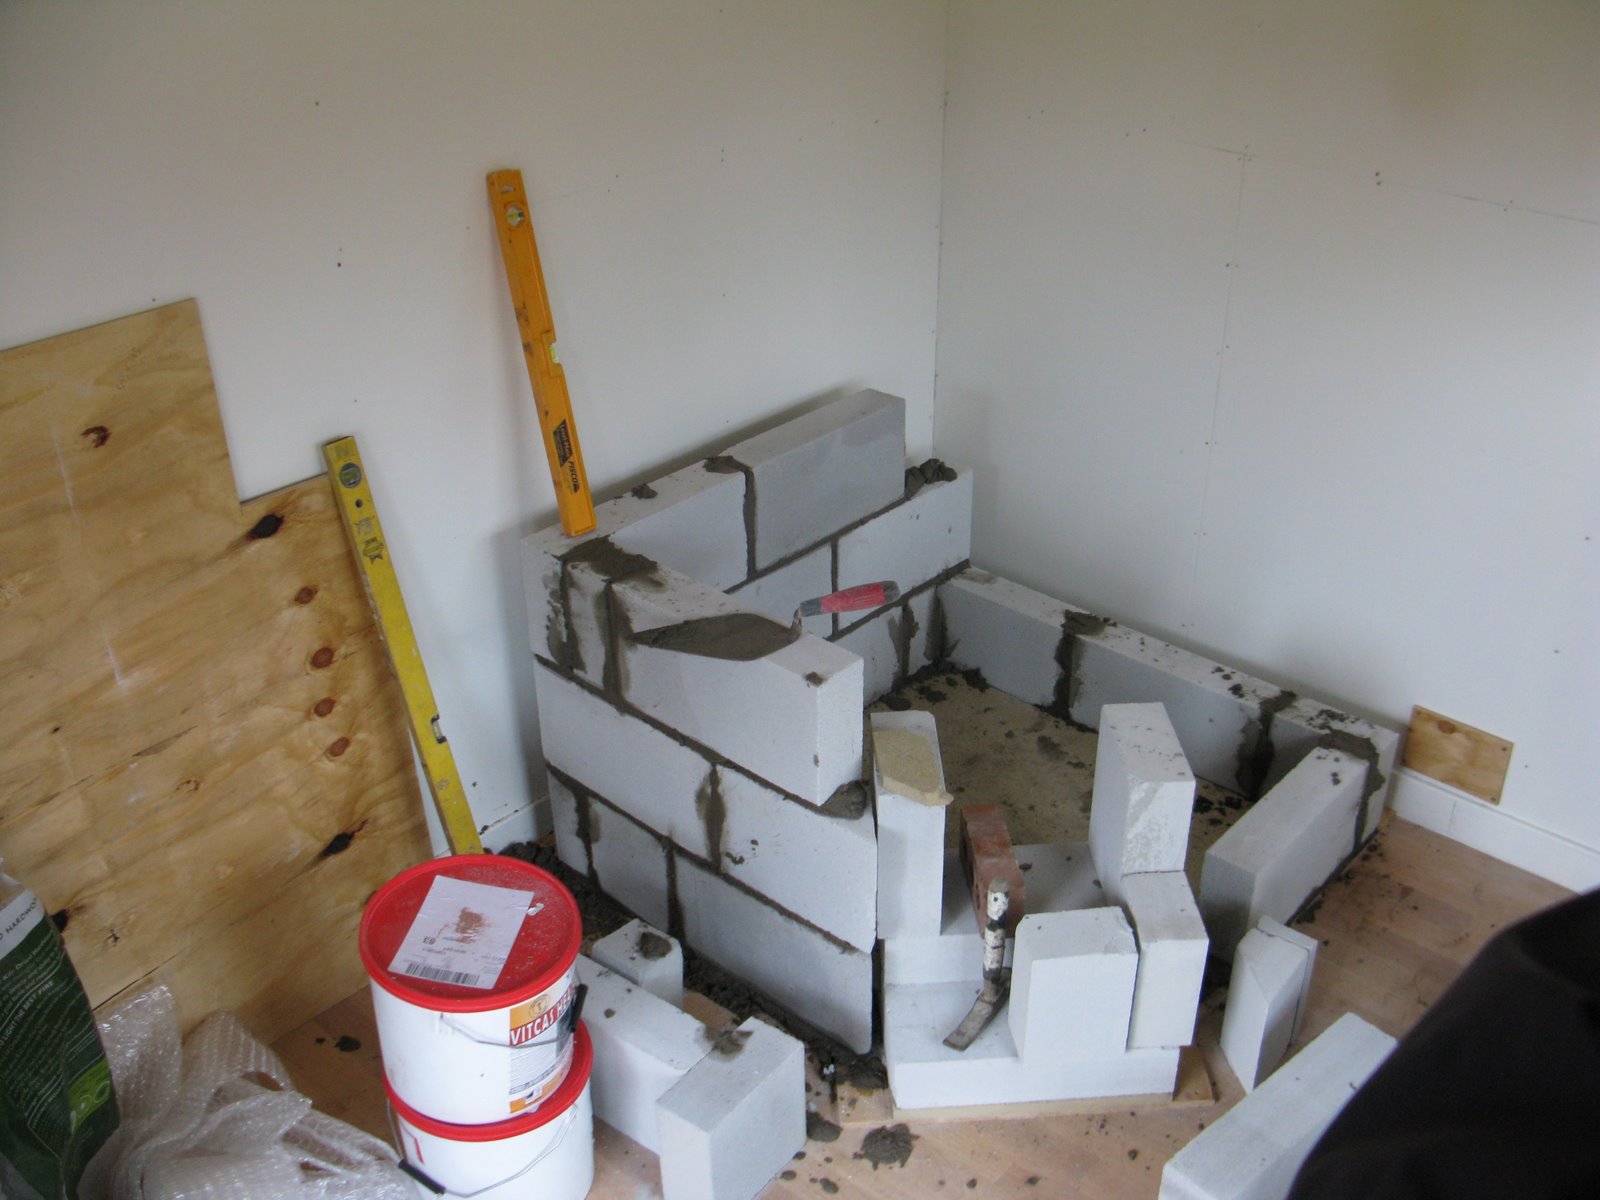
Blocks and mortar
The next step was to fit the blocks nicely and mortar them into place. For this we got Dave our neighbour downstairs to come and help. He is a builder and can do this kind of thing standing on his head. Ok, I've never actually seen that but I bet he could. I'd like to see it, for sure. I'm definitely going to think up a situation that would require upside-down brick laying.
So anyway, Dave pitched up back of nine with a load of sand and cement. First he built the outer walls and we mocked up the fireplace:


All that stuff under the block is loose fill vermiculite insulation. After that was done we had lunch. After lunch we built up the front and the riser sleeve:

And that was all the blockwork done. Eight hours on the nail. I think I could have spent a week doing it by myself, easily, and it still wouldn't have been straight or level.
So anyway, Dave pitched up back of nine with a load of sand and cement. First he built the outer walls and we mocked up the fireplace:
Next he set the fireplace and the combustion chamber floor:

All that stuff under the block is loose fill vermiculite insulation. After that was done we had lunch. After lunch we built up the front and the riser sleeve:

And that was all the blockwork done. Eight hours on the nail. I think I could have spent a week doing it by myself, easily, and it still wouldn't have been straight or level.
Wednesday, 9 February 2011
The Genie of the Oven
Having recognized my lack of experience in blockwork, I got my pal and neighbour Dave to come and spend a day working on it. Dave, being a builder, has plenty of experience with block and he sure did earn his money.
First though, the floor needed to be ready to receive the block. This meant a stabilizing sheet of ply and lots of screws, and several sheets of vermiculite board. You can use loose fill vermiculite for all kinds of things and it is very cheap. Vermiculite board is quite a bit more expensive but it has good compression strength, a rated operating temperature of 900 degrees celcius and provides excellent insulation. Guy and I spent half a day measuring, cutting, screwing down and figuring out how to get the vermiculite board to cover the required area without wasting too much of it. In the end it looked like this:

The last bits to go in were those two small dark triangles. The ones that look like the eyes, under a massive turban. As soon as I fitted them Guy said "Oh, it's a computer-generated genie."
It makes me irrationally happy to think of him down there, insulating the floor and keeping us safe from bakery fires.
Monday, 7 February 2011
Laying it out
So the first thing was to lay all the blocks out dry, just to get an idea of how they would go together. I had several goes, and this was the prettiest:

Aerated concrete is pretty amazing stuff. It has a structure like an Aero chocolate bar, lots of tiny holes. This means that those blocks are incredibly light, and have quite respectable insulating qualities. You can also cut them with an ordinary hand saw; you can see some of the various sizes I produced in the picture.
Actually, useful though that is, I soon discovered that it was a potential problem. Every time I started on a new course, I realized that there were at least five ways to go about it and that I lacked the experience to decide how it should best be done. There was a real possibility that in finding out, I was going to reduce my entire supply of block to dust and miscellania. It was time to get some help.
Friday, 4 February 2011
The Steamie rocket oven: a quick intro
Three weeks ago it was my intention to blog our progress if not daily, then at least three or four times a week. But I'm not a natural blogger, and somehow 'blog entry' so often gets bumped onto tomorrow's todo list.
We're now halfway through our projected refitting time. I think we're still on track. It may be a bit of a scramble at the end, but then these things do always seem to be. In the meantime, I've revised my blogging intentions: I will try to write short, pithy posts in the hope that I will actually get around to writing them. Here's the first.
The basic scheme of our oven is to have three baking chambers ('decks', in baker-speak) heated by an efficient wood burner. Each deck is a kind of box-within-a-box, so that the burner can vent between the inner and outer skins. The outer skin is insulated so that most of the heat goes into heating the inner baking space. Here's a cutaway section:
 The fire happens down around my shins (the fire doors are open in the picture, but close during use), and burns sideways along the horizontal combustion chamber. The hot gases then head up the internal chimney ('riser sleeve') to the bottom of the first deck. The gap between the inner and outer skins of the decks is pretty narrow (30mm) to transfer as much heat as possible.
We have finished all of the blockwork and screeded the hot faces We are now waiting for the screed to go off and for the steel decks to arrive from the blacksmith. 'We', I should add, currently means myself, Zillah, Dave (our neighbour, and boss of the building work - more of him later) and Zillah's brother, Guy. Guy is an architect, carpenter, CAD wizard and all round jolly good chap. He did the drawing above (as well as very many others) and has done a fantastic job coordinating materials. If you need anything at all doing to your house or any other building, he's your man.
Next: setting up the blocks.
We're now halfway through our projected refitting time. I think we're still on track. It may be a bit of a scramble at the end, but then these things do always seem to be. In the meantime, I've revised my blogging intentions: I will try to write short, pithy posts in the hope that I will actually get around to writing them. Here's the first.
The basic scheme of our oven is to have three baking chambers ('decks', in baker-speak) heated by an efficient wood burner. Each deck is a kind of box-within-a-box, so that the burner can vent between the inner and outer skins. The outer skin is insulated so that most of the heat goes into heating the inner baking space. Here's a cutaway section:

We have finished all of the blockwork and screeded the hot faces We are now waiting for the screed to go off and for the steel decks to arrive from the blacksmith. 'We', I should add, currently means myself, Zillah, Dave (our neighbour, and boss of the building work - more of him later) and Zillah's brother, Guy. Guy is an architect, carpenter, CAD wizard and all round jolly good chap. He did the drawing above (as well as very many others) and has done a fantastic job coordinating materials. If you need anything at all doing to your house or any other building, he's your man.
Next: setting up the blocks.
Tuesday, 18 January 2011
Building starts this week
This week sees the start of building the new oven.
The bakery has been dismantled and packed up. Tins, baskets, scales, bowls, brushes and linen all put into storage for the next six weeks. Even the oven must go into storage. We hope it will be in use before long for demonstration events.

The building materials are arriving - the standard brick and block type stuff yesterday and the specialist fire resistant and heat proof things today.

The moment the delivery crane loomed over the back wall, threatening to put down a load of block on my perennial fruit and vegetable garden was an interesting one, but it was landed safely on the path between the plants and the washing line.

Over the next six weeks this unpromising looking space will be transformed into a fuel and space-efficient wood fired oven.

Monday, 10 January 2011
Cardamom Love
There's been quite a bit of enthusiasm for cardamom amongst Bread Clubbers after the success of the Christmas Julekage, so I thought I'd share one of my favourite savoury recipes using cardamom.
Cardamom (Elletaria cardamomum) originated in India, but has been used in Europe and the Middle East for centuries - for flavouring coffee in Egypt, in sweet baking in Scandinavia, Germany and Eastern Europe. In India it's used for sweet dishes, but also in curry mixes such as garam masala. I love to use it with rice, it gives a wonderful gentle spicy aroma that seems to sit well with many Indian or Middle Eastern recipes. The seed contains volatile oils, so it's particularly worthwhile buying pods of cardamom and grinding the seeds yourself. (To get the seeds out of the pods I just squash to pod under the bottom of their jar until the pod cracks, and it's then easy to get at the seeds).
Here's my recipe for Cardamom Rice
Ingredients
1 tablespoon each of oil and butter
1 smallish onion, chopped finely
3 cardamom pods
About a tablespoon of spice seeds, according to what the rice is to accompany, I often use cumin, fennel, fenugreek and mustard if I'm making curry.
500g brown rice
1 litre of water or chicken stock (or a mixture or the two)
1 teaspoon of salt.
Heat the oil and butter in a heavy saucepan. I find the best thing for the job is an earthenware pan with a lid, which can go on the hob, but something like a Le Creuset would work OK too.
Put in the chopped onion and sweat over a gentle heat until the onion is translucent.
While the onion is cooking, rinse the rice under running water.
Add the spices to the onions, stir for a few minutes, then add the rice and turn the heat up to medium. Keep stirring to coat the rice grains in the oil and butter.
Pour in the stock and/or water and bring to the boil. The boil it fairly hard for 10 minutes.
Put the lid on the pan and turn down the heat as low as it will go. Use a heat diffuser, if you have one. Now just let it cook very gently for about an hour and a half. Don't take the lid off or stir it (unless you think it's going to burn on the bottom, in which case, add a little more boiling water).
Turn off the heat and, without taking the lid off, let it sit for 20 minutes or so more. Finally, take off the lid and give the rice a fluff with a fork. The grains should be nice and soft and puffed up, and not a bit tough, as brown rice can sometimes be.
Great with chickpea curry, green veg and yoghurt.
Wednesday, 5 January 2011
happy happy
Isn't it cool how you can stop thinking about something for a while, but the brain just carries on chewing it over without bothering you about it? I noticed this when I was an undergraduate; essays would come out better if, having done a pile of reading, I played the violin for a week before I started writing.
Before Christmas I was trying to tie down a load of different things in the bakery, and never quite got them all working at once. Over Christmas, it was really good to take a step back, see the bigger picture, and concentrate on drinking and stuffing my face. Today, back in the bakery, it seemed as though all those things had just shaken down and fallen into place. Seven oven loads were mixed, folded, scaled, moulded, proved and baked, 1, 2, 3, 4, 5, 6, 7, straight through, without a hitch. Every one ready when it was time to go into the oven, not a watt of electricity wasted. Mixer cleaned, tubs rinsed, tins wiped, leaven made and flour weighed out for tomorrow. Home for supper and putting the girls to bed. Another time I'll write about why I think everything worked so well; this evening I just wanted to note that I am a very happy baker today.
Before Christmas I was trying to tie down a load of different things in the bakery, and never quite got them all working at once. Over Christmas, it was really good to take a step back, see the bigger picture, and concentrate on drinking and stuffing my face. Today, back in the bakery, it seemed as though all those things had just shaken down and fallen into place. Seven oven loads were mixed, folded, scaled, moulded, proved and baked, 1, 2, 3, 4, 5, 6, 7, straight through, without a hitch. Every one ready when it was time to go into the oven, not a watt of electricity wasted. Mixer cleaned, tubs rinsed, tins wiped, leaven made and flour weighed out for tomorrow. Home for supper and putting the girls to bed. Another time I'll write about why I think everything worked so well; this evening I just wanted to note that I am a very happy baker today.
Monday, 3 January 2011
The Christmas Loaf
This year we made a variation on the traditional Scandinavian Christmas loaf, the Julekage. Julekage's traditional features are dried fruit and cardamom spicing. Because we love it, we added a swirl of marzipan in the middle of the loaf. Topped with a good dredge of icing sugar, the result was was attractive and delicious. Here's a picture of the small sized loaf - the large had a much more dramatic swirl of marzipan.

We made our own marzipan to go in the loaf. It's easy to do, and has the great advantage that it tastes of almonds, rather than invert sugar syrup.

The cardamom spicing made this a great loaf to go with a cup of coffee. Happy New Year!

We made our own marzipan to go in the loaf. It's easy to do, and has the great advantage that it tastes of almonds, rather than invert sugar syrup.

The cardamom spicing made this a great loaf to go with a cup of coffee. Happy New Year!
Subscribe to:
Posts (Atom)

